Introduction to Copper Press Fittings
In the world of plumbing, precision and durability are everything. A small leak can lead to devastating water damage, costly repairs, and unhappy homeowners. Enter copper press fittings—a revolutionary solution that combines strength, simplicity, and a watertight seal. For years, copper has been a go-to material in pipe systems, but press fittings elevate its potential to new heights. If you're a professional plumber, a contractor, or even a homeowner exploring reliable plumbing options, this guide unveils everything you need to know about leak-free copper press fittings.
1. Why Copper? The Backbone of Modern Plumbing
Copper has stood the test of time in plumbing. But why is it still the material of choice in a market brimming with plastic alternatives?
Durability and Longevity
Copper boasts impressive durability. It resists high pressure, extreme temperatures, and mechanical damage. Properly installed copper piping systems can last over 50 years—sometimes even a century. That’s a lifespan that puts most plastic options to shame.
Corrosion Resistance and Health Benefits
Unlike galvanised steel, copper doesn't rust. Its natural corrosion resistance prevents pipe degradation, maintaining water quality. It’s also a biostatic material, which means bacteria struggle to survive on its surface. This makes copper ideal for delivering safe drinking water.
Moreover, copper doesn’t leach harmful chemicals—no microplastics, no endocrine disruptors. That’s why it’s often used in hospitals and schools, where health and safety are paramount.
2. What Are Press Fittings?
Press fittings are mechanical connectors that use pressure to join copper pipes without the need for soldering or welding.
How They Differ from Traditional Fittings
Traditional plumbing often relies on heat-based soldering, requiring open flames—a potential hazard in confined or sensitive environments. Press fittings, however, are installed using a hydraulic press tool that compresses the fitting onto the pipe, creating a permanent, leak-proof seal.
This flame-free system reduces fire risk and speeds up the job.
Types of Press Fittings Available
Press fittings come in a variety of shapes and sizes:
Elbows (90° and 45° angles)
Tees (for branch connections)
Couplings (for straight joins)
Adapters (for joining to threaded pipes)
Each type is designed with sealing elements—typically EPDM or HNBR rubber O-rings—to ensure a watertight seal under pressure.
3. Installation Process Explained
Installing press fittings is not only safer but also significantly faster than traditional methods.
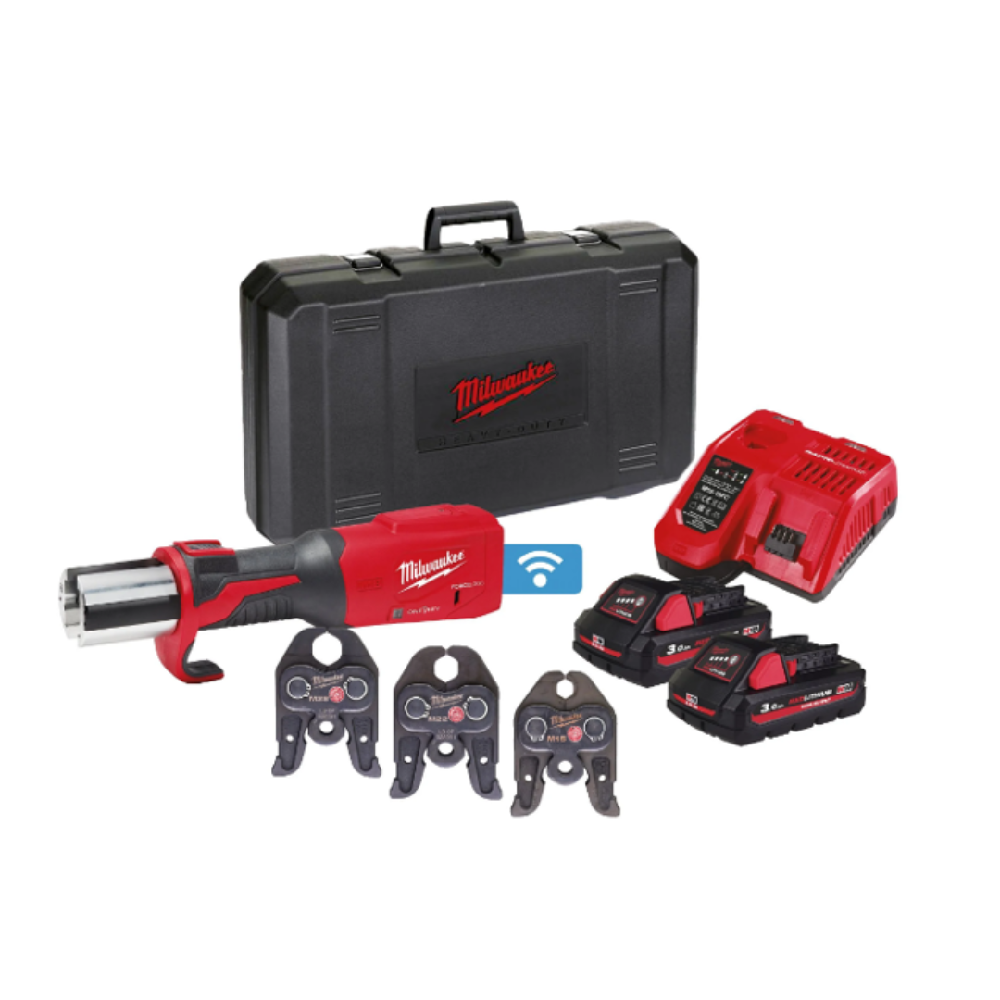
Tools Required
Press tool (manual, battery-operated, or electric)
Pipe cutter
Deburring tool
Depth gauge
Marker pen
Step-by-Step Guide
Measure and cut the copper pipe to the desired length.
Deburr and clean the pipe ends to remove sharp edges and debris.
Mark insertion depth with a gauge to ensure proper alignment.
Insert the fitting onto the pipe until it reaches the depth mark.
Use the press tool to compress the fitting—creating a secure, leak-proof connection.
That’s it! No waiting for joints to cool, no purging the system of gas, and no dealing with excess solder.
4. Leak-Free Assurance: How Press Fittings Prevent Water Damage
One of the greatest benefits of press fittings is their consistent seal quality.
Uniform Pressure Sealing
The mechanical press applies uniform pressure around the fitting, engaging the O-ring and copper simultaneously. This ensures no weak points, unlike soldered joints where human error or uneven heating can result in future leaks.
Real-World Leak Prevention Stats
According to plumbing industry surveys, press fittings show a 95% reduction in leak-related call-backs compared to traditional soldered systems. That's huge when you’re dealing with large-scale installations or commercial properties.
5. Cost Comparison: Press Fittings vs Traditional Methods
Isn’t all this high-tech equipment expensive? Not necessarily.
Material Costs
While the fittings themselves may be slightly more costly than soldered components, you save in other areas. Copper press fittings require fewer consumables—no flux, solder, or gas.
Labour and Time Efficiency
Press fittings are a dream for labour costs. Installers can complete connections in less than half the time compared to soldering. This means:
Lower labour charges
Shorter project timelines
Reduced downtime for businesses or homeowners
In many cases, the initial investment in press tools pays for itself within a few jobs.
6. Environmental Impact and Sustainability
Copper press systems are not only efficient—they're eco-friendly too.
Copper Recycling and Eco-Friendliness
Copper is one of the most recycled materials on earth. In fact, up to 80% of copper ever mined is still in use today. Press fittings make it easier to disassemble systems without damaging the pipes, supporting reuse and recycling.
Reduced Water Wastage
Because the connections are reliable and rarely leak, press fittings help prevent water loss—something that’s becoming critical in drought-prone regions and urban infrastructure planning.
7. Safety and Regulatory Compliance
Safety is a non-negotiable in plumbing. Press fittings raise the bar.
Fire-Free Installation Advantage
Without the need for torches or solder, there’s zero risk of fire, making press systems perfect for wooden structures, hospitals, or high-rise flats with stringent safety codes.
Meeting Building Codes
Press fittings are widely approved under international and British plumbing standards. Whether you're working under BS EN 1057 or WRAS certification, copper press systems tick the boxes.
Common Myths About Press Fittings Debunked
Let’s clear the air:
Myth: Press fittings aren’t as strong as soldered ones
Truth: When installed correctly, they meet or exceed pressure and burst strength standards.Myth: The O-rings wear out quickly
Truth: Quality fittings use EPDM or HNBR seals rated for decades of use.Myth: They're not good for hot water
Truth: Press fittings are ideal for both hot and cold systems, up to 110°C or more.
Maintenance and Inspection Best Practices
Though press fittings are low-maintenance, it’s still wise to:
Visually inspect joints annually
Use leak-detection dye or tools if necessary
Replace worn-out O-rings if dismantling a joint
Thanks to their consistency, most issues stem from improper installation rather than material failure.
FAQs
1. Are copper press fittings suitable for gas lines?
Yes, with the correct type of O-ring (usually HNBR), press fittings are certified for gas applications.
2. Can I use press fittings on old copper pipes?
Absolutely—just ensure the pipe is in good condition and free from corrosion.
3. How long do copper press fittings last?
Most manufacturers rate them for 50 years or more, with proper installation.
4. Are press tools expensive?
Quality tools start around £300, but they quickly pay for themselves in saved time and labour.
5. Do press fittings work in tight spaces?
Yes, compact press tools and fittings make them ideal for confined or awkward areas.
6. Is a press system more secure than solder?
Yes—especially when installed correctly. Press connections offer consistent sealing, unlike variable solder joints.
Conclusion
Copper press fittings are transforming plumbing—offering speed, safety, durability, and above all, leak-proof reliability. Whether you're outfitting a modern flat or retrofitting a historic property, press fittings give you peace of mind that your system will hold strong for decades to come.
Say goodbye to blowtorches and hello to a cleaner, faster, and greener way to plumb. Invest in copper press fittings—and make leaks a thing of the past.
Pick up your Copper Press Fittings at Press It Today
.jpeg)

Pegler Xpress Water 90degrees Bend 22mm
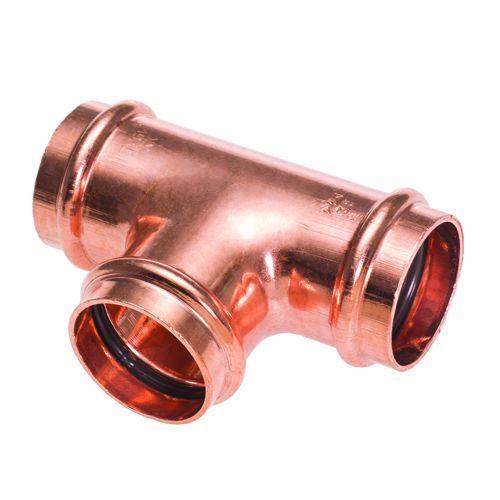
Conex B Press Water Equal Tee 15mm
Shop our wide range of Copper Press Fittings now.